Revision: 989ecedf7f
Edited Add a BuyBack
@@ -1 +1,55 @@
-New Wiki Page
+With the growing business opportunities, repair shops are not restricted to repairs anymore. They accept used gadgets and devices for resale. However, it is not as easy as it seems. Sometimes, a customer walks in with a used device to resell but your deal gets pushed back to a pending queue. At times, the item bought is not in the perfect condition to be sold right away and needs to be repaired. All these situations require a normal repair POS to evolve and become smarter.
+
+**RepairDesk BuyBack**
+----------------------
+
+RepairDesk is the smarter repair POS that repair shops of today require and desire. It offers you to purchase a used device, create a refurbishment ticket for a device bought, share a quote for a used device you are interested in buying, and upgrade your inventory.
+
+**_Fun Fact:_**
+
+Did you know buyback items offer you a better profit? You can save on money, earn a better profit and upgrade your inventory with buyback items.
+
+**Add a BuyBack**
+-----------------
+
+Just imagine a customer walks in with a device to sell. What are the steps you would take? Probably, check the device to rate its quality, ask for features, see the accessories it comes with and put a quote. Since you are a smart repair shop, let’s have you do all these steps in your RepairDesk shop.
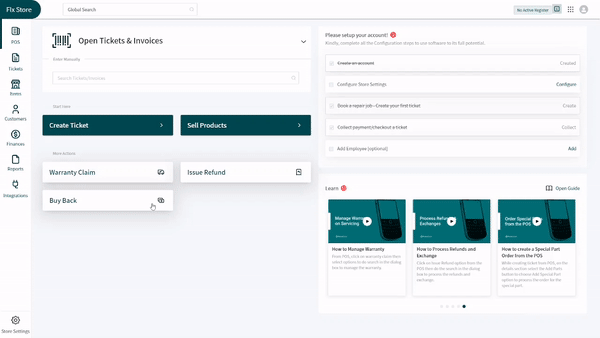
+Log in to your shop and head to the _POS_ screen. Look for the **BuyBack** button placed in the **More Actions** section right under the **Warranty Claim** button.
+- Click on the **BuyBack** button. It will slide in a new window from the right corner.
+
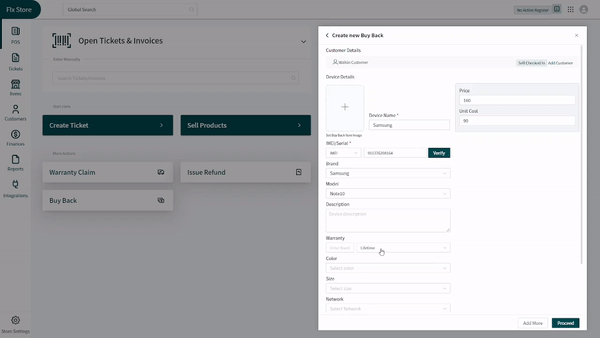
+- Click on the **Create New BuyBack** button on the top right corner of the screen. Preset device categories will open for you to choose from. Click on the category of device you want to add.
+
+
+- When buying a device from a customer whose details are already entered in your POS, click **Add Customer** button present in the **Customer Details** section. This will open a search bar for you to search for the customer. Else, set the toggle to a walk-in customer.
+
+- You can attach a picture of the device by clicking on the image box. Add the device’s name and IMEI in designated text boxes. You can verify IMEI by clicking on the **Verify** button in front of the IMEI textbox.
+
+- Select the brand and model from the dropdowns. Add some description to the device and warranty from the dropdown options.
+
+- Select the preset size, color, network, and condition from the dropdowns for each field.
+
+- Add selling price in the **Price** textbox and buying rate in the **Unit Cost** textbox.
+
+- More devices can be added by clicking on the **Add More** button at the bottom of the screen. Click on the **Proceed** button to view the summary of the device/s.
+
+- The new screen will give you two options at the bottom to choose from. You can either proceed or create a [purchase bid](https://docs.repairdesk.co/purchase_bid).
+
+
+
+
+### Purchase Used Device
+
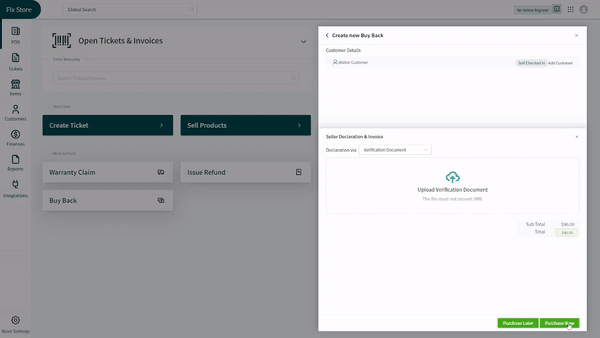
+While you are on the _Device’s Overview_ screen after entering the necessary details, click on the **Proceed** button at the end of the screen next to the **Purchase Bid** button. This will open a new screen for you.
+
+You can upload a verification document by clicking on the field designated for the document. In case you want to take the customer’s signature, click declaration via dropdown and select the **Customer Signature** option. Clicking on **Purchase Later** from the end of the screen will add the device in pending purchases. You can view them under **History Filter**.
+
+**_Purchase Options_**
+
+If you wish to buy the device right away, click on the **Purchase Now** button from the _Device’s Overview_ screen. It will open a pop-up screen for you to select a payment method. Once done, you can proceed to pay and make an invoice by clicking on **Proceed to Invoice** button.
+
+The invoice will be created and saved. Now, you can either add the item to inventory by clicking on **Add to Inventory** button or create a refurbishment ticket by clicking on **Create Refurb Ticket**. You can view options to create barcode label, receipt and internal store receipt on the new pop-up. Click on the desired button or click on **Complete** button to end the process.
+
+
+
+You can click on **Purchase Later** button next to **Purchase Now** button for the device details to be stored in the _"Pending Purchases"_ that can be viewed under the filter on main _BuyBack_ screen.
+
+Regardless of the age, model, company, or network, legacy assets hold value. Now, purchase all legacy items with RepairDesk and make more money by saving time and keeping Earth greener by recycling.♻️🌳