Revision: 8abf3c7a07
Edited Tax Configuration
@@ -1 +1,78 @@
-New Wiki Page
+Taxing is one of the most important elements of a repair shop. It is connected with inventory, sales, profit, customers and what not? Looking at its importance don’t you think it must be handled well? We thought so you would say yes. RepairDesk has already designed a smart taxing system with various configurations and settings for you.
+
+What’s in it for you?
+---------------------
+
+1. Introduce multiple tax categories for your store.
+2. Change values of taxes according to the market trends.
+3. Enable a tax group either for a category or storewide.
+4. Apply multiple tax on selected services or items.
+
+Let’s Set Your Taxes
+--------------------
+
+RepairDesk has divided tax settings into two tabs for the ease of its users. The first tab deals with taxes that can be introduced as they come and go while the second tab deals with VAT only. We will discuss both the settings one by one.
+
+### General Tax Configuration
+
+Begin with logging into your RepairDesk account. Once you have logged in, follow the given path to open tax settings:
+
+> Path: \\Store Settings > Tax Configuration > General
+
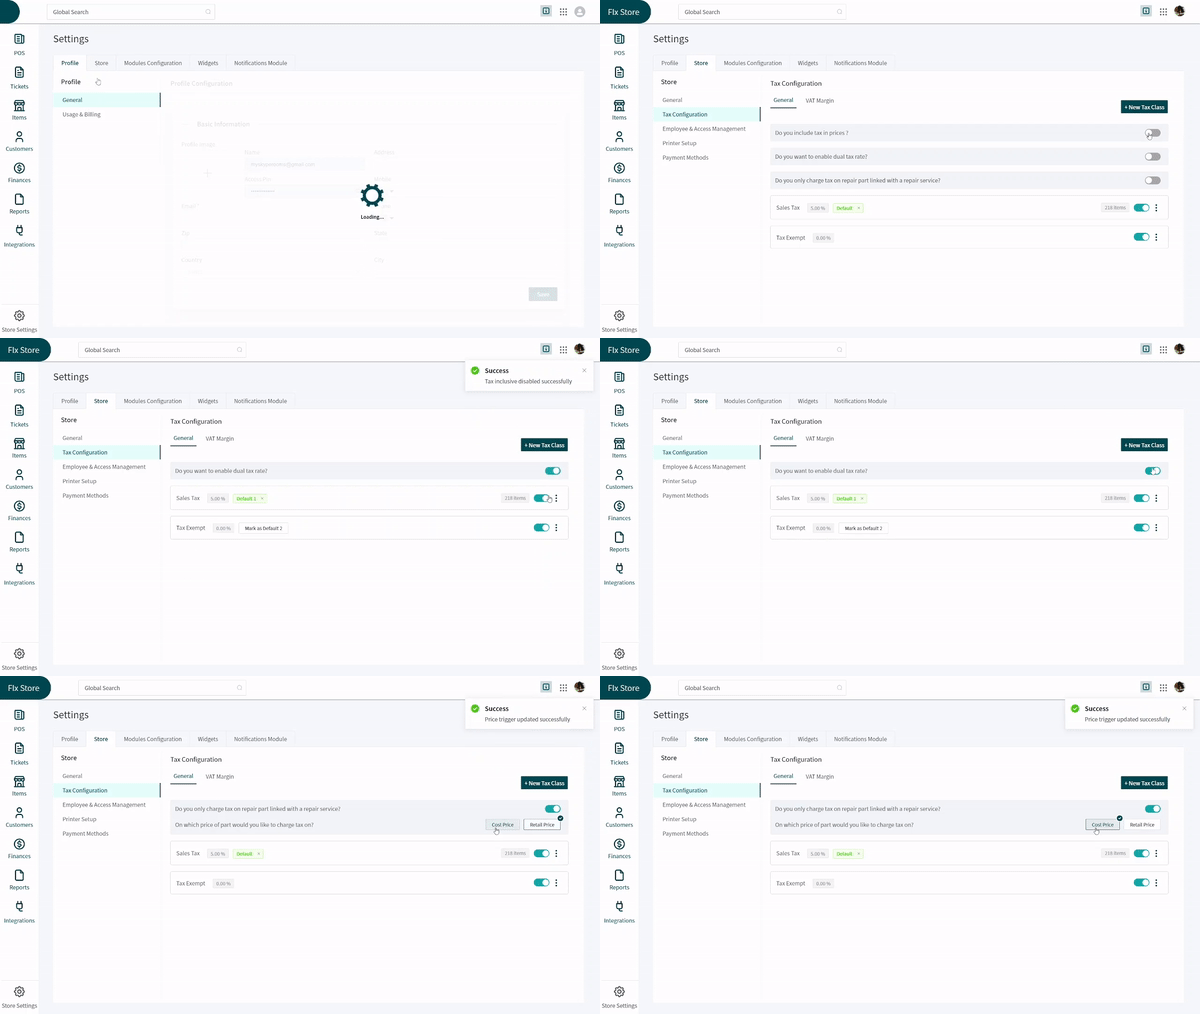
+1. The first toggle allows you to have taxes included in the sale price of an item. You can enable the option by clicking on the toggle button. Once it turns green, the option has been enabled.
+2. If you want to charge tax on the items used in a repair service, turn on the third toggle. Once enabled, the option extends to ask you if you want to add tax in cost price or in retail price. Click on the option you want to avail.
+3. One thing you must note is that these three toggles are connected. Turning one toggle on, removes the option to enable other two toggles.
+
+
+
+**Add a New Tax Class**
+
+1. RepairDesk’s taxing configuration allows you to introduce new tax classes. If you aim to add a new tax class, here are the steps you must follow:
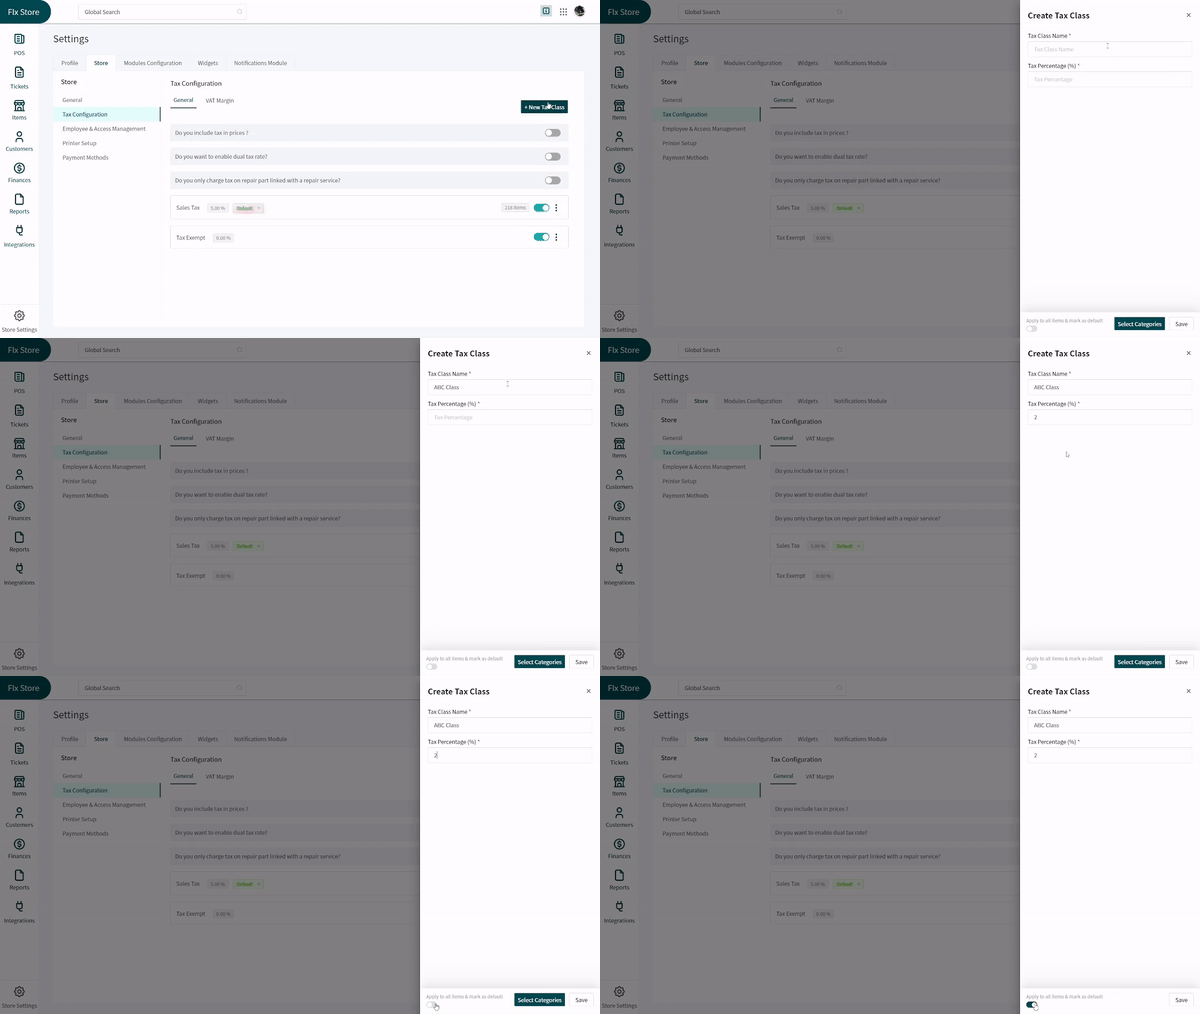
+2. Click on the **Add New Tax Class** button located at the top right corner of the screen.
+3. A new window will slide in from the right side of the screen. You can enter the name of the text class and its tax percentage in the designated textboxes.
+4. If you want to apply this tax class storewide, click on the checkbox at the bottom left corner of the window.
+
+
+
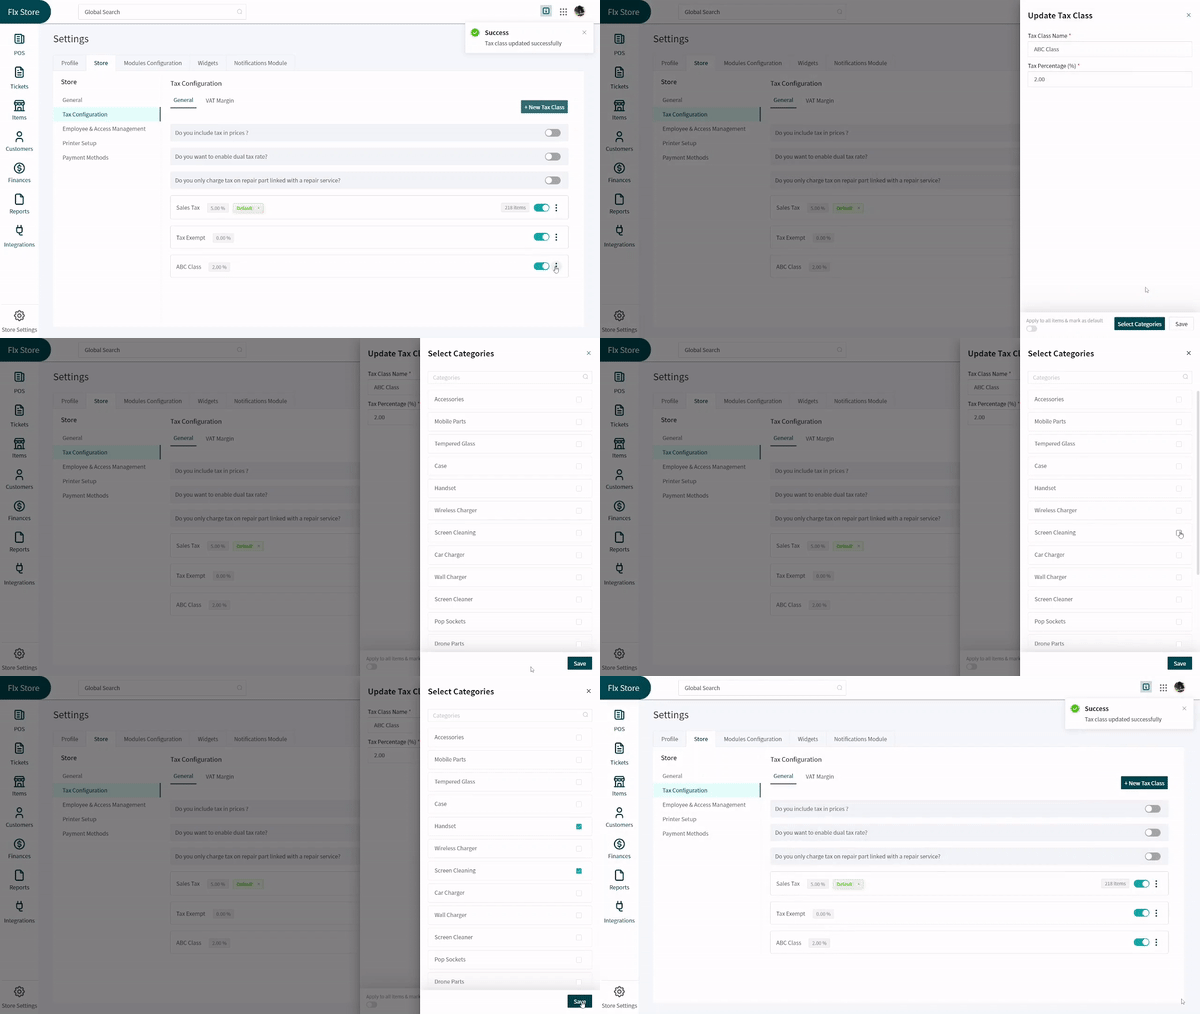
+1. Select categories you want to apply this new tax class on by clicking on the **Select Categories** button to view a list of items. Check the checkbox in front of every category you want to select. Press the **Save** button to save your settings.
+2. This will bring you back to the **Tax Class** window. Press the **Save** button at the bottom right corner to activate your tax class.
+3. Now you can see your tax class among the active tax classes on the **General Tax Configuration** screen.
+
+**Edit or Delete Existing Tax Classes**
+
+Active tax classes appear on the **General Tax Configuration** screen. The user can delete a tax class by clicking on the three dots next to its name. This will open a dropdown for the user to select the option of **Delete**. You can also edit the existing tax classes.
+
+Select **Edit** from the dropdown that opens from clicking three dots next to the tax class’s name. This will open a window where you can edit the name or the tax percentage. You can apply this tax class to all items in the store by checking the checkbox at the bottom left corner of the window.
+
+To apply tax only on a limited number of items, you can access the item categories from the below right corner of the window. Clicking on **Select Categories** opens a list of items along with checkboxes for the user to choose desired items categories.
+
+Click on the **Save** button at the bottom leading to you the main tax class window. Click the **Save** button here again.
+
+
+
+### Dual Tax Configuration
+
+Dual tax allows you to apply two tax categories on a device or product. This helps you in a situation where your government requires you to charge dual tax. Here is how you can do it:
+
+1. While working on the _General Tax Settings_, you can use the second toggle to enable or disable the option for dual tax.
+2. Once you turn on the toggle, every store item has dual tax rates applicable on them.
+3. The toggle can be turned off whenever desired to disable dual tax for the store.
+
+### VAT Margin Configuration
+
+A VAT margin is the tax charged on the profit earned by selling a product. A lot of countries around the globe require shopkeepers to enable VAT margin for their stores. RepairDesk’s VAT configuration is designed to make lives of users living in VAT applicable areas easier than ever. Once you have logged in your RepairDesk account follow the given path and steps for VAT configuration:
+
+> Path: \\Store Settings > Tax Configuration > VAT Margin
+
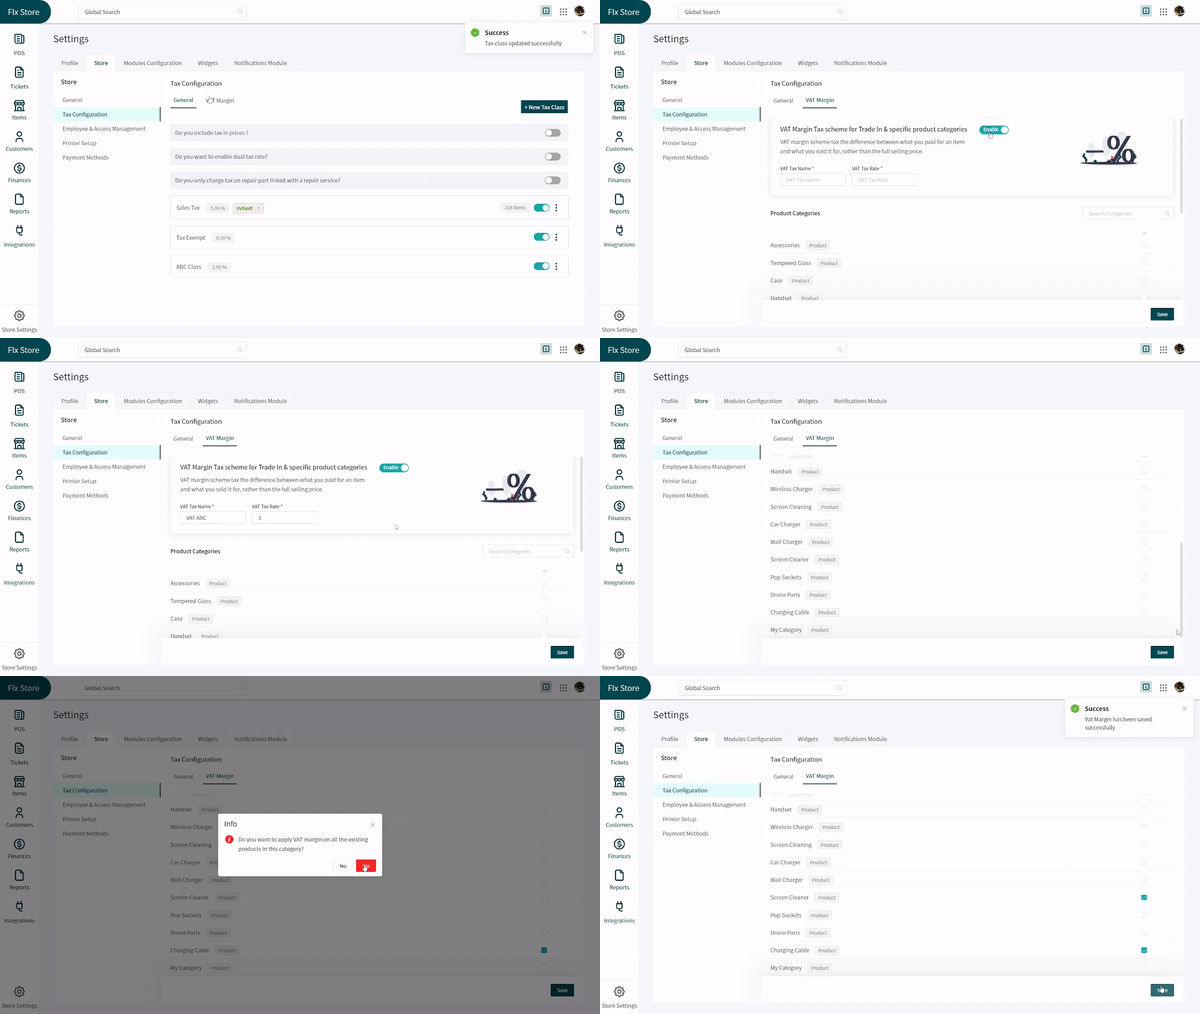
+1. Click on the toggle available in the first line of the **VAT Margin** screen. This will enable VAT for your store.
+2. In the name textbox, you can add the name you have chosen for your VAT tax class. Enter tax rate in the textbox for VAT tax rate.
+3. Scroll down to access a list of product categories with checkboxes against them. Check the checkbox for every category you want VAT to apply on.
+4. Clicking on a checkbox opens a dialogue-box asking you if you want to apply VAT on the existing items or enable it only for new items to fall in the category. Select the option you like.
+
+
+
+1. Once done, click on the **Save** button at the bottom right corner of the screen.
+
+🥁🥁 Drumrolls!!🥁🥁
+
+Your tax settings have been configured and we can see you on your to become a giant.