Revision: 86f0ddd5bb
Edited Edit BuyBack
@@ -1 +1,44 @@
-New Wiki Page
+The journey of a buyback does not end at purchasing a product. Once the product goes into your purchase list, you might have to edit its details or use it for some predefined purpose. For such instances, RepairDesk has created the option of editing a buyback for its users.
+
+**Edit Buyback**
+----------------
+
+Having buyback items in your store is not all about just placing them in the inventory. You might need to go through the list of the items you bought and make a few changes. For such events, RepairDesk has given its users the option to edit buybacks. There are two ways you can edit the buybacks added.
+
+### Edit Buyback from Items
+
+After you have logged in to your account, go to the _POS_ screen. Check the list of options on the left side of the screen and follow the path given below:
+
+> Path: \\Items > Buybacks
+
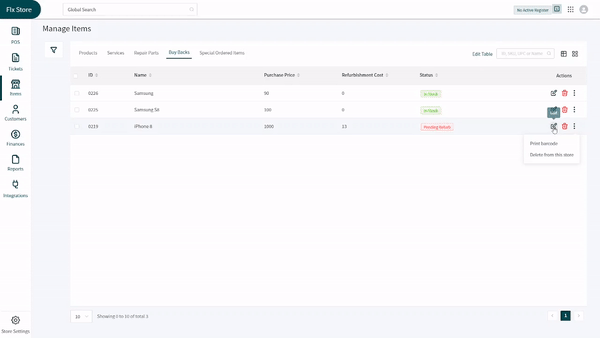
+- Click on the pen and paper icon in the **Actions** given against the item you want to edit. When you hover over it, you can see _Edit_ written.
+
+- This will open all details of the item including references, general information, pricing, and additional information.
+
+- If you want to hide the item from the _POS_ screen, check the checkbox on the left side of the screen under the section bar.
+
+- You can check the box under the **Hide from POS** checkbox to use the item for scrapping parts needed.
+
+- Edit all you want and click on the **Save** button placed on the top right corner of the screen.
+
+
+
+### Edit Buyback from POS
+
+Used items bought can also be edited from the _POS_ screen. Here are the steps you need to follow:
+
+- Click on the **Buyback** button placed in the _More Actions_ section.
+
+- Click on the purchased item from the list of items shown. It will open the item’s details on a new tab.
+
+- You can choose sections to edit either by scrolling down or selecting the section from the section bar on the left side of the screen.
+
+- Use the **Hide from POS** checkbox to hide the item from the _POS_ screen. You can use the **Scrap for Parts** button to mark the item for scrapping parts.
+
+- Once done with editing, click on the **Save** button placed on the top right corner of the screen.
+
+**_Quick Tips:_**
+
+To delete the item or print the barcode, click the three dots in the **Action** column against the item on the _Manage Items_ screen. Select the desired option from the dropdown. In case you have forgotten the path, here it is:
+
+> Path: \\Items > Buybacks