Revision: 7c101ab23f
Edited Import Repair Parts
@@ -1 +1,38 @@
-New Wiki Page
+Some repair services require the technician to replace some parts to make the device work like new. This makes it a necessity for the repair shop owners to have their inventory full of these repair parts. However, at times, the repair shop owners already have a list of repair parts that they would like to import rather than adding one after the other in the system. What can be done in such cases? Well, lucky for you, RepairDesk provides an import solution for repair parts as well.
+
+Import Your Repair Parts
+------------------------
+
+You can import all the repair parts you want within a few clicks. Firstly, open the path given below and then follow all the steps:
+
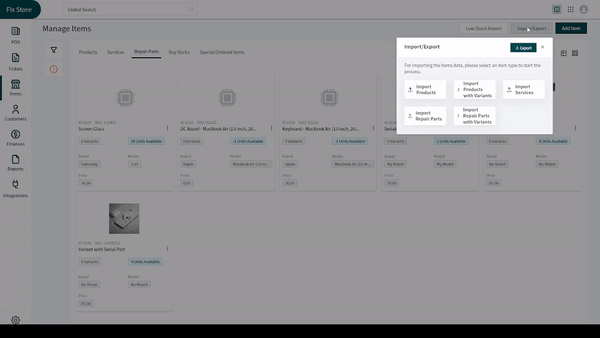
+> Path: \\Items > Manage Items > Repair Parts
+
+1. Click on the **Import/Export** button placed at the top right corner of the _Repair Part Import_ screen.
+2. Click on the **Download Sample File** dropdown at the right corner of the screen to download and fill the file. Skip this step if you have downloaded the file beforehand.
+3. Open the downloaded file and the desired data in the designated columns. Save it when all data has been entered.
+4. Head to the _Import Repair Part_ screen and click on the **cloud-upload** image present in the _Upload Item Data_ section and upload the document.
+5. Click on the **Next Step** button in the right side of the screen.
+6. Map your entered values on variables on the next screen. You can change the default mapping by using the dropdowns available in front of every information.
+7. Click on the **Next Step** button placed at the right side of the screen.
+8. New screen will provide you an overview of the information you are about to import. Review the information and click on the **Confirm Import** button at the right side of the screen. In case you want to make some changes, click on the **Back** button placed next to **Confirm Import** button.
+9. On the new popup screen, click **Confirm** button to proceed with importing repair parts.
+
+
+
+
+
+Import Your Repair Parts with Variants [](https://docs.repairdesk.co/import_products#import-your-products-with-variants)
+-------------------------------------------------------------------------------------------------------------------------
+
+If you are worried that your repair parts have variants and you would want all those uploaded as well, RepairDesk has gotten you all covered. Open the path given previously and follow these steps:
+
+1. Click on the **Import/Export** button present at the right top corner and download the sample file by clicking on the **Download Sample File** dropdown at the right corner of the screen.
+2. Open the downloaded file and enter all the data in the columns. Every row will make a new variable of the repair part name you enter.
+3. Head to your store on RepairDesk and click on the **cloud-upload** image present in the _Upload Item_ present in the _Product Import_ page.
+4. Upload the edited document and click the **Next Step** button in the right side of the screen.
+5. Use the next screen to map the entered values on variables of your choice. Use the dropdowns available in front of every information to change mapping.
+6. Click on the **Next Step** button placed at the right side of the screen.
+7. See the overview of the mapped information on the new screen. Review the information and click on the **Confirm Import** button at the right side of the screen. In case you want to make some changes, click on the **Back** button placed next to **Confirm Import** button.
+8. On the new popup screen, click **Confirm** button to proceed with importing repair parts.
+
+