Revision: 417ab61cbd
Edited RepairDesk Payments
@@ -5,9 +5,11 @@
RepairDesk Payments is a new feature introduced for the ease of our customers. It allows the shop owners to receive payments from the customers via their credit or debit cards. Here are some of the benefits you can enjoy with RD Payments integration:
-1. **No Extra Setup**: RD Payments are easy to integrate as it is our very own module. You would not need to install any other applications or multiple devices to get your work done.
-2. **Save You Time**: RD Payments are easy to set up and takes you no more than 3 minutes. You can integrate and start receiving payments without wasting much time.
-3. **Easy Settings**: As compared to other payment integrations, RD Payments provide you easy and minimal settings. You can perform different actions without switching between multiple screens and feeling overwhelmed.
+1. **No Extra Setup**: RD Payments are easy to integrate as it is our very own module. You would not need to install any other applications or multiple devices to get your work done.
+
+2. **Save You Time**: RD Payments are easy to set up and takes you no more than 3 minutes. You can integrate and start receiving payments without wasting much time.
+
+3. **Easy Settings**: As compared to other payment integrations, RD Payments provide you easy and minimal settings. You can perform different actions without switching between multiple screens and feeling overwhelmed.
Integrate RD Payments
---------------------
@@ -22,23 +24,31 @@
> Path: \\Integrations > RepairDesk Payments
-1. Once you have found the RepairDesk Payments tile among other integrations, click on the **Setup** button.
-2. Switch the toggle on the top to enable integration for your repair store.
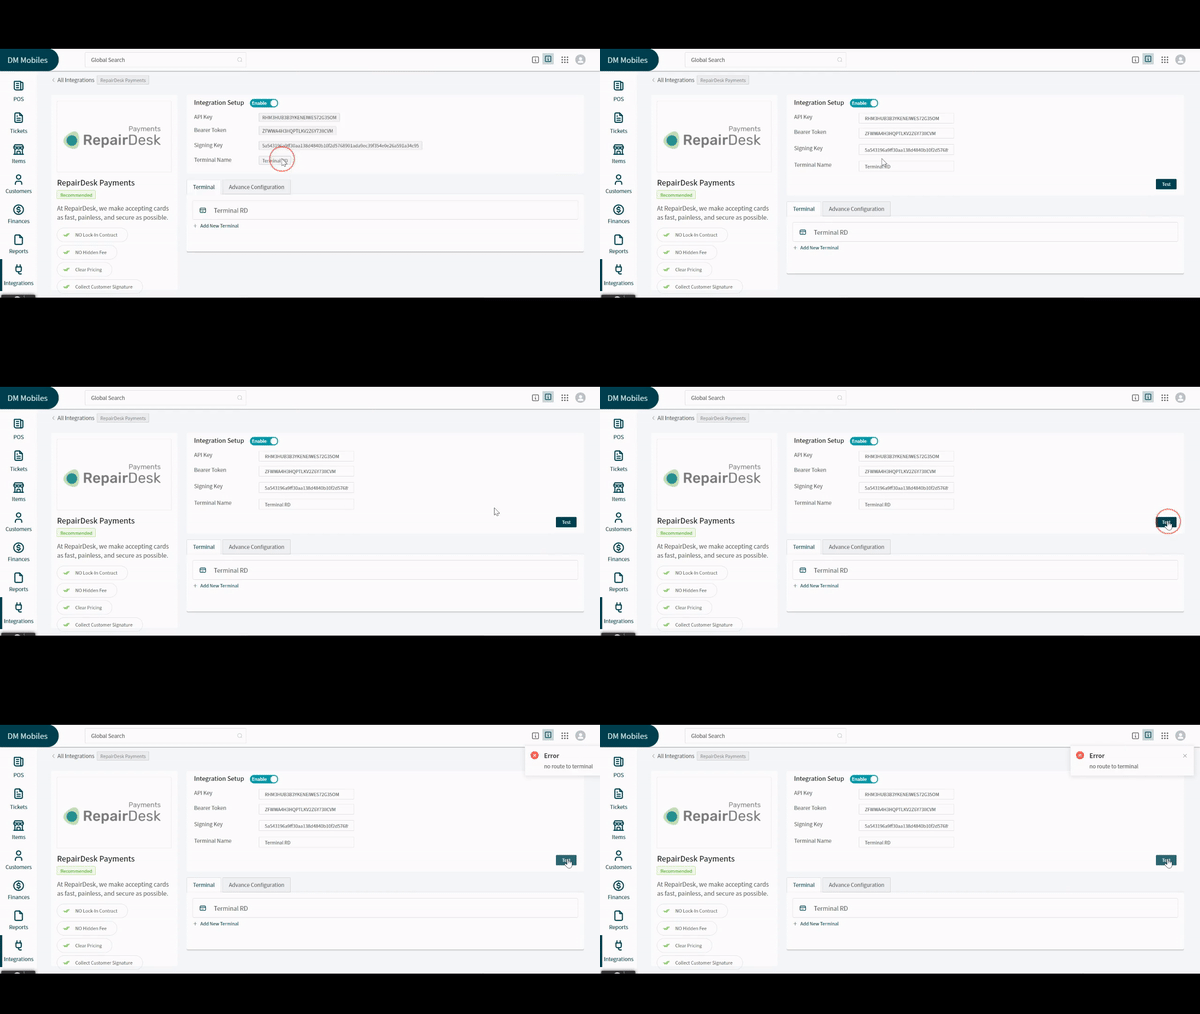
-3. Enter the API Key provided by **BlockChyp** along with other details like bearer token, signing key, and terminal name in the provided text boxes.
-4. If your payment terminal is not active or properly set, you would get a connection error upon clicking **Test** button at the bottom right.
+- Once you have found the RepairDesk Payments tile among other integrations, click on the **Setup** button.
+
+- Switch the toggle on the top to enable integration for your repair store.
+
+- Enter the API Key provided by **BlockChyp** along with other details like bearer token, signing key, and terminal name in the provided text boxes.
+
+- If your payment terminal is not active or properly set, you would get a connection error upon clicking **Test** button at the bottom right.

-
+- Once your terminal is properly connected and running, click on the **Test** button at the bottom right to test the terminal.
-1. Once your terminal is properly connected and running, click on the **Test** button at the bottom right to test the terminal.
-2. Now, click on the **Save** button to save the terminal. You will see the terminal live in the terminals below.
-3. Click on the _Advance Configuration_ tab to open further settings.
-4. Use the given toggles to turn on or off tipping, cash discount, and customer signature. Turning on toggle against any feature will display an option for that particular feature on the payment terminal.
-5. You can use the text box assigned for **Terms and Conditions** to add all the important points you would like to show on the payment terminal for RD Payments.
-6. You can also enable or disable the option of **Pay Now** for your customers who want to pay from RD Payment's terminal.
-7. Use the buttons for **Promotional Image**, **Promotional Video** and **Slideshow** to add the respective media to your terminal.
-8. Click on the **Save Settings** button at the bottom right corner to save changes done to the settings.
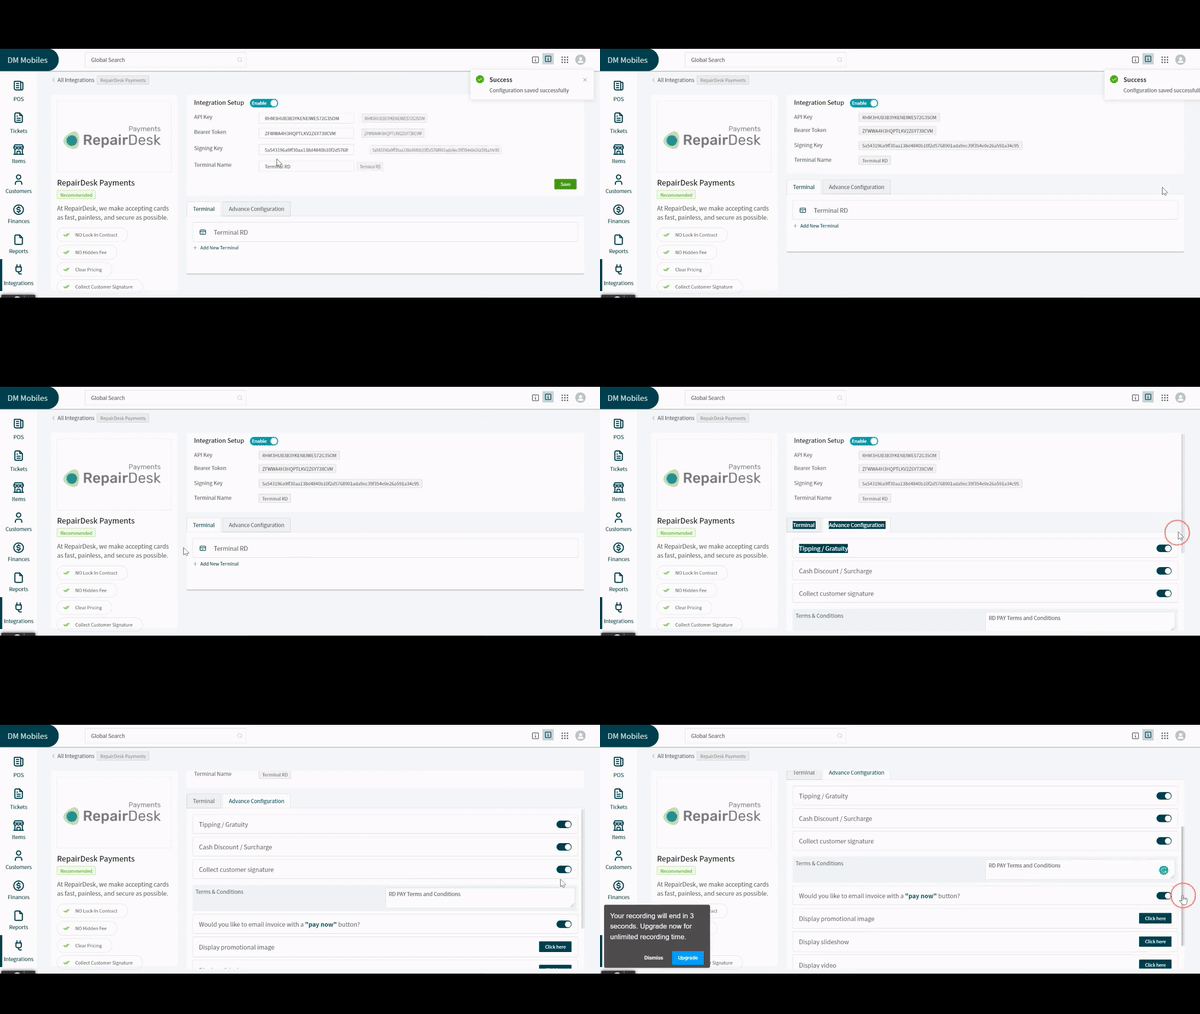
+- Now, click on the **Save** button to save the terminal. You will see the terminal live in the terminals below.
+
+- Click on the _Advance Configuration_ tab to open further settings.
+
+- Use the given toggles to turn on or off tipping, cash discount, and customer signature. Turning on toggle against any feature will display an option for that particular feature on the payment terminal.
+
+- You can use the text box assigned for **Terms and Conditions** to add all the important points you would like to show on the payment terminal for RD Payments.
+
+- You can also enable or disable the option of **Pay Now** for your customers who want to pay from RD Payment's terminal.
+
+- Use the buttons for **Promotional Image**, **Promotional Video** and **Slideshow** to add the respective media to your terminal.
+
+- Click on the **Save Settings** button at the bottom right corner to save changes done to the settings.

@@ -51,20 +61,25 @@
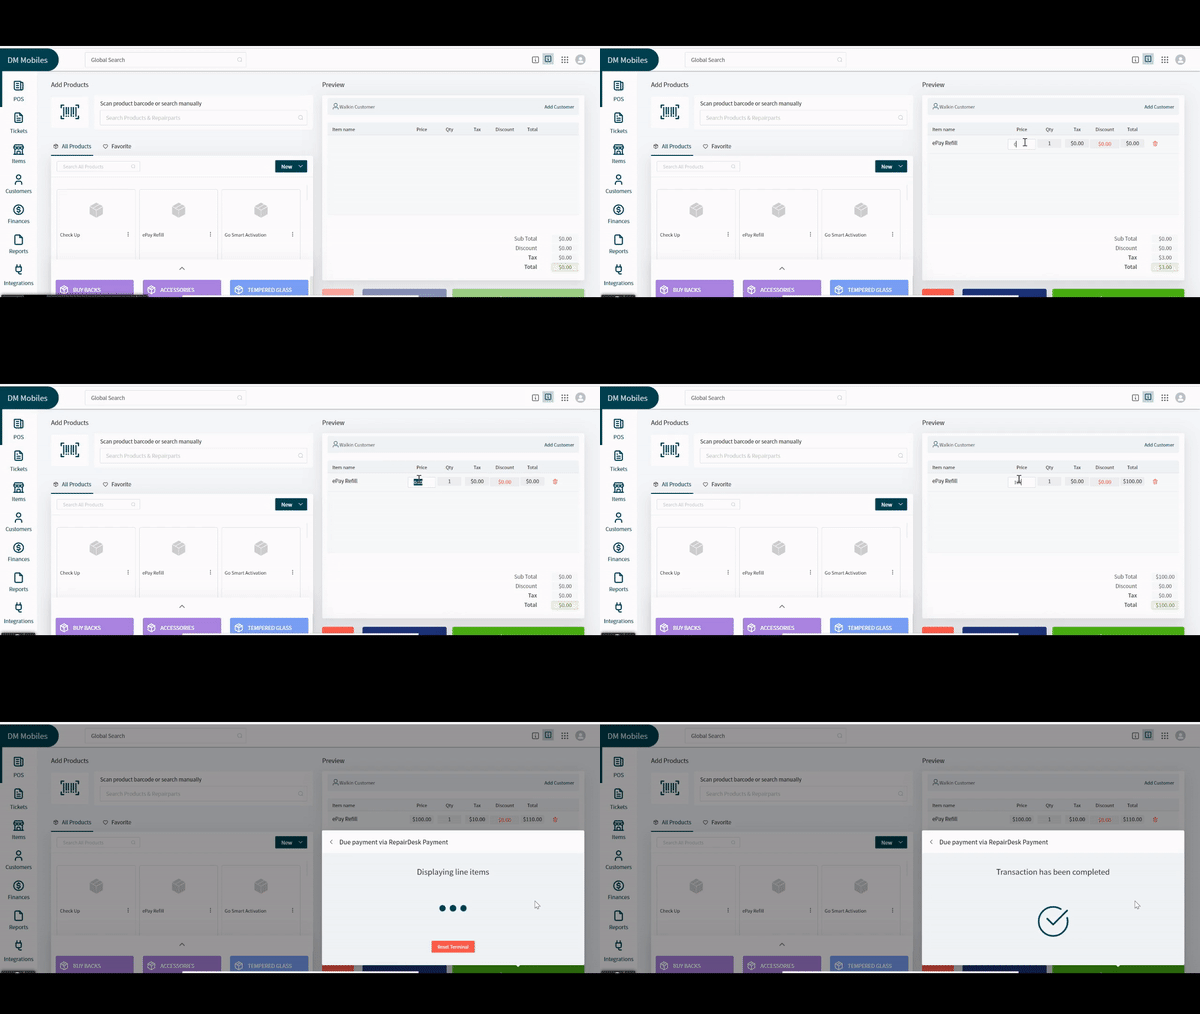
You must know the steps to process the payment. Here is how you can do it:
-1. Make a ticket and add the device you want to sell. Proceed to checkout by clicking on the **Checkout** button at the bottom right.
-2. You will be presented all the active payment options you have for your repair store. Ensure that the price of the device to be charged is more than 0 to see RepairDesk Pay as a payment option.
-3. Select **RepairDesk Pay** by clicking on its button and enter the amount you want to charge. The amount must be greater than 0.
-4. The terminal connected with become active asking you to either swipe or insert the card depending on its category. You can see the status of the payment getting updated on your POS as the process goes on the terminal.
-5. Once payment is collected, either proceed to generate invoice or deal your next customer.
+- Make a ticket and add the device you want to sell. Proceed to checkout by clicking on the **Checkout** button at the bottom right.
+
+- You will be presented all the active payment options you have for your repair store. Ensure that the price of the device to be charged is more than 0 to see RepairDesk Pay as a payment option.
+
+- Select **RepairDesk Pay** by clicking on its button and enter the amount you want to charge. The amount must be greater than 0.
+
+- The terminal connected with become active asking you to either swipe or insert the card depending on its category. You can see the status of the payment getting updated on your POS as the process goes on the terminal.
+
+- Once payment is collected, either proceed to generate invoice or deal your next customer.

### Accept Pending Payment
-
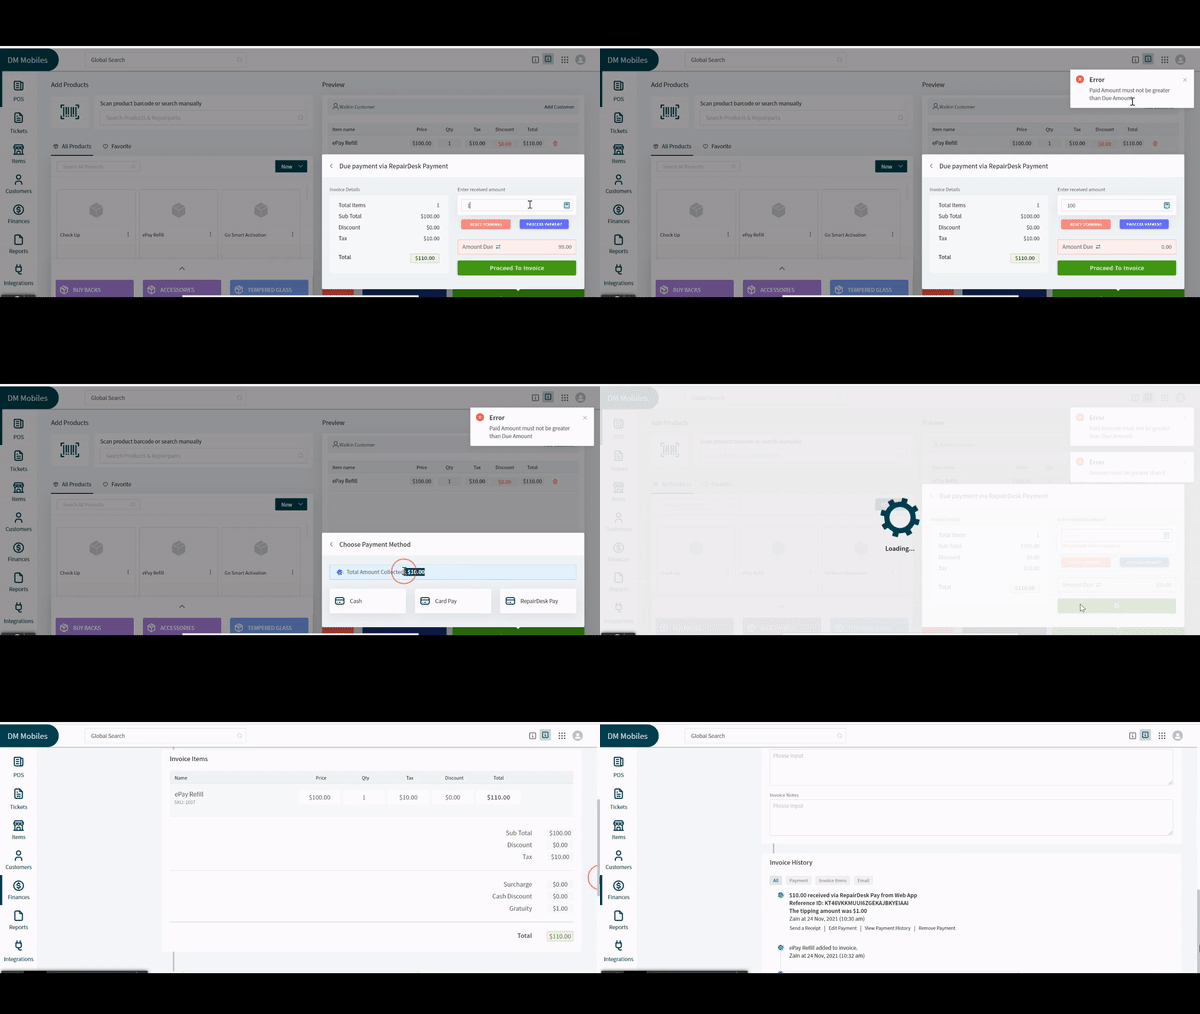
If you have a partial paid receipt, you can receive pending payment against it through RD pay. You have to open the ticket from invoices and follow the steps given below:
-1. Proceed to checkout and select **RD Pay** like in the previous case. Make sure the amount you enter is not greater than the remaining amount or you would get an error message.
-2. Click to the **Proceed to Pay** at the bottom. Now, you would see updates on the POS according to the steps taken on the payment terminal.
-3. From the new popup, you can either select from the given buttons of **Print Invoice**, **Print Thermal Receipt**, **Email Invoice** or **View Invoice**.
+- Proceed to checkout and select **RD Pay** like in the previous case. Make sure the amount you enter is not greater than the remaining amount or you would get an error message.
+
+- Click to the **Proceed to Pay** at the bottom. Now, you would see updates on the POS according to the steps taken on the payment terminal.
+
+- From the new popup, you can either select from the given buttons of **Print Invoice**, **Print Thermal Receipt**, **Email Invoice** or **View Invoice**.
